Privy Starter Kit
The Rootstock Privy Starter Kit empowers developers to onboard users with social logins and self custodial wallets while preserving control, privacy, and flexibility for dApps when building on Rootstock.
Privy handles security at the infrastructure level. Private keys are split using advanced cryptography and never stored in full. Sensitive operations run in Trusted Execution Environments (TEEs) for deep isolation, and the system is backed by SOC 2 certification and regular third party audits.
With Privy, you can:
- Design wallet flows
- Integrate authentication and wallet management directly into your app
- Multiple sign in methods, including email, social logins, and OAuth
- Provision embedded, self custodial wallets with crosschain support that fits your product’s needs
- Manage permissions, and choose between out of the box UI components or low level API access depending on your choice of control.
In this guide, you'll learn how to set up a React project that uses Privy for authentication and Wagmi for on-chain interactions.
Getting Started
Clone the pre-configured starter kit project:
git clone https://github.com/rsksmart/rsk-privy-starter-kit
Create an account and get a project ID from the Privy dashboard, this will be used to set up the Privy provider with Wagmi config.
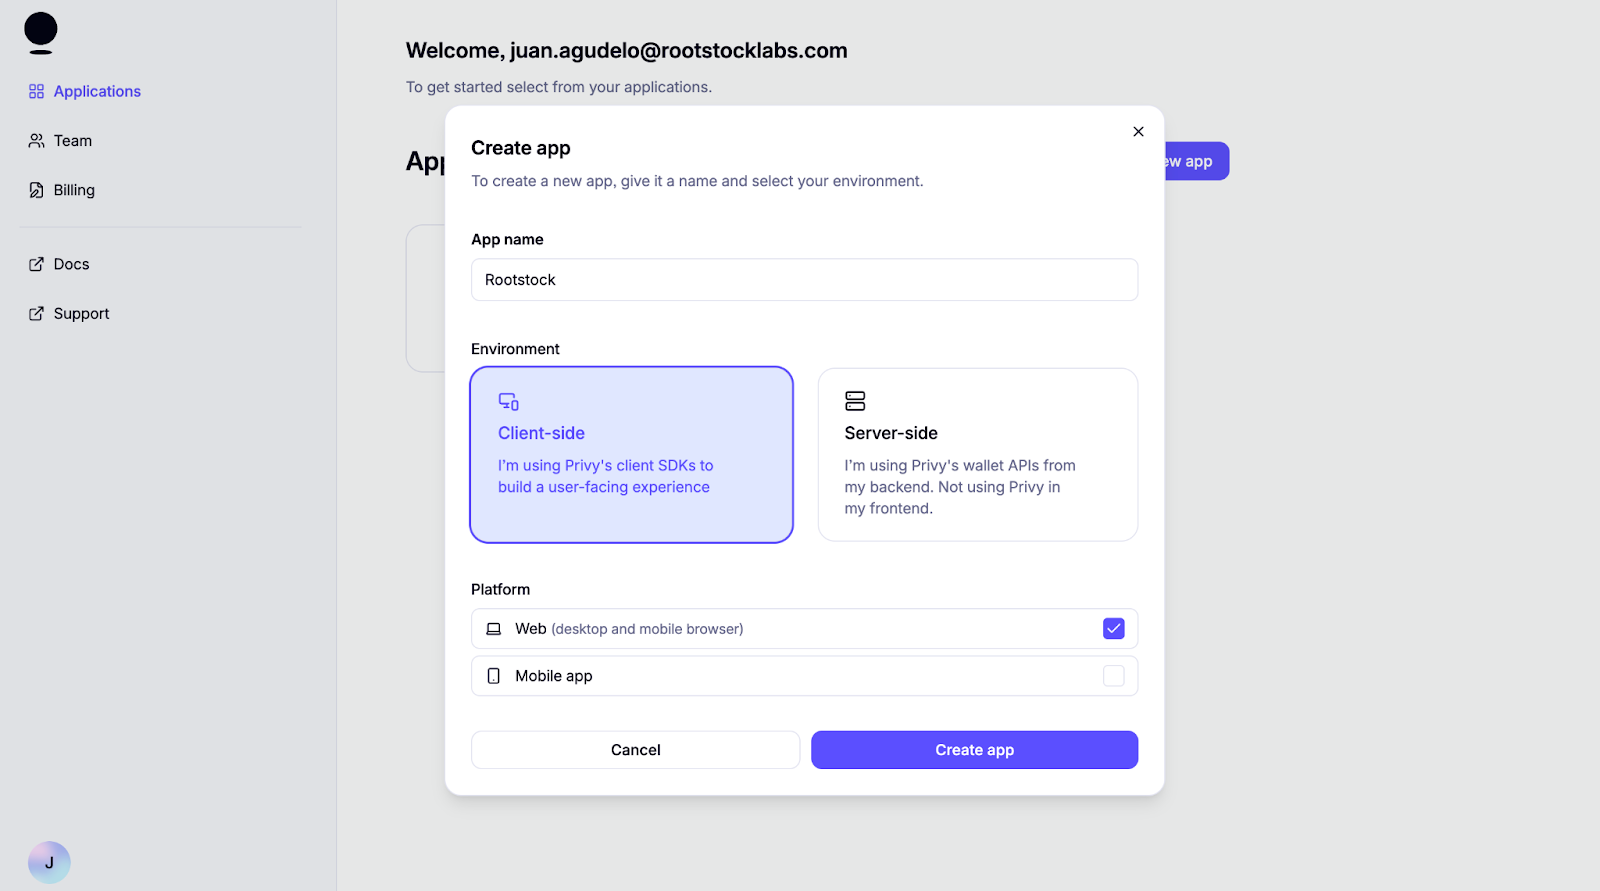
Once logged in, create a new project for a client environment and web platform.
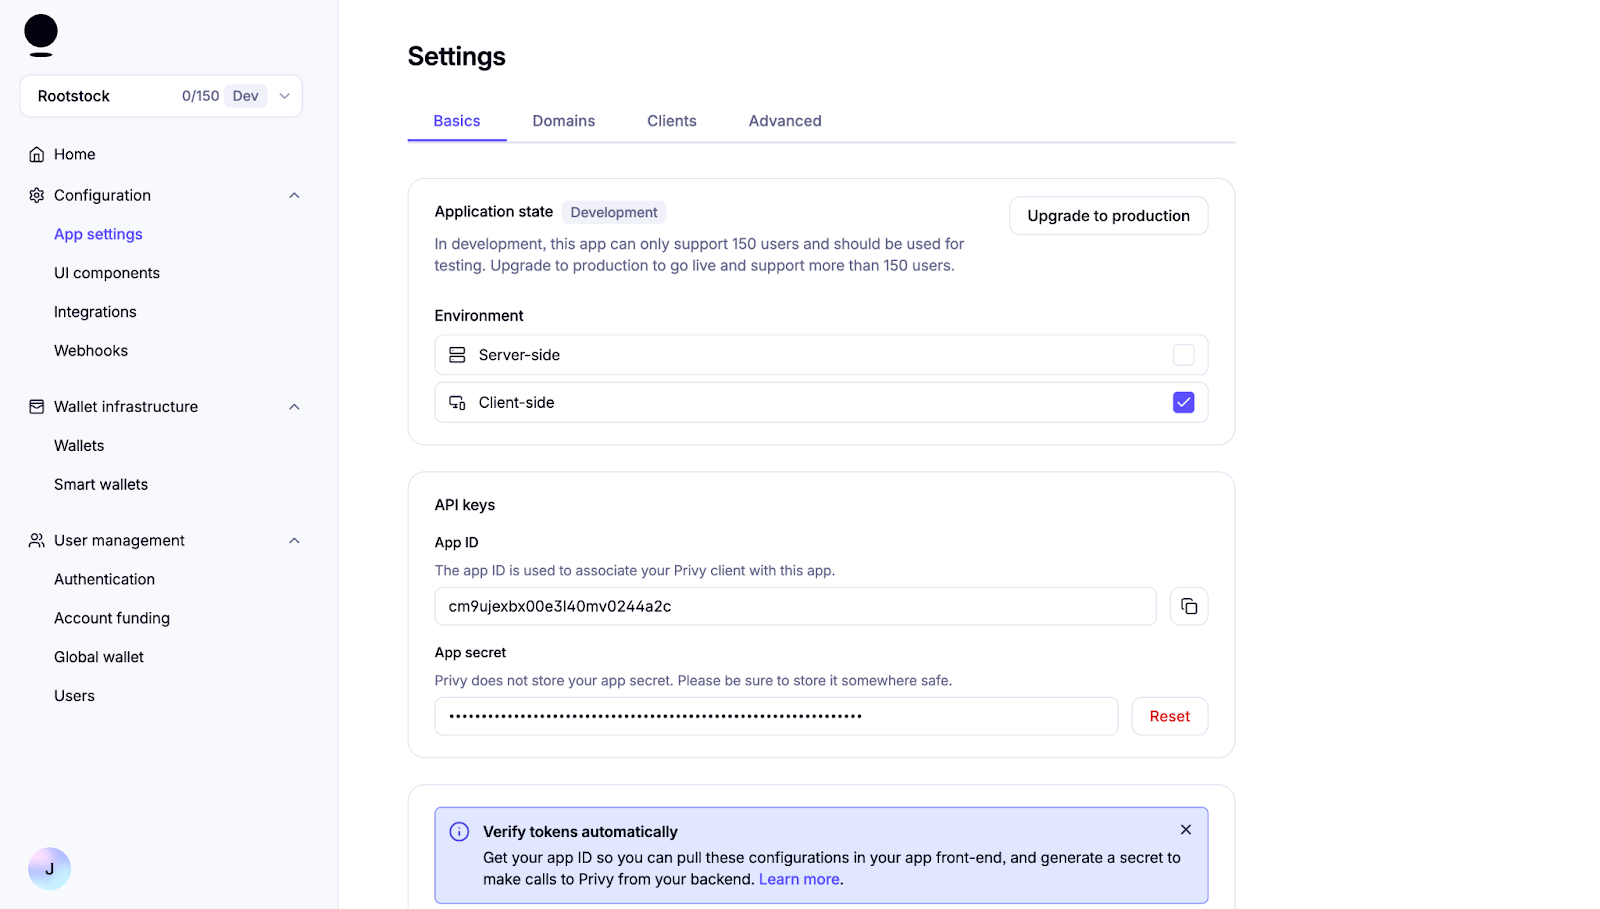
Navigate to the App settings to find the App ID. Keep the App ID handy; you'll need it to set up the context next. This setup gives access everything Privy can do.
Configure Environment Variables
Locate the file .env.example and rename to .env. Replace the App ID previously configured:
VITE_PRIVY_APP_ID='your Privy App ID'
Integrating Wagmi and Privy�
Configuring the Providers Component
Privy will be used for auth and wallet creation, and Wagmi is used to manage blockchain interactions and account state.
export default function Providers({ children }: { children: React.ReactNode }) {
  return (
    <PrivyProvider
      appId={appId}
      config={privyConfig}
    >
      <QueryClientProvider client={queryClient}>
        <WagmiProvider config={wagmiConfig} reconnectOnMount={false} >
          {children}
        </WagmiProvider>
      </QueryClientProvider>
    </PrivyProvider>
  );
}
To make this work, the WagmiProvider and PrivyProvider each require their own configuration objects. Let’s take a closer look at the setup.
Configuring Wagmi
The createConfig from @privy-io/wagmi is used to define a wagmiConfig object that connects our app to the Rootstock mainnet and testnet using viem's HTTP transport. This configuration is then passed to the WagmiProvider, enabling the app to interact with the blockchain and access Wagmi’s React hooks for account state, transactions, and other on-chain operations.
export const wagmiConfig = createConfig({
  chains: [rootstock, rootstockTestnet],
  transports: {
    [rootstock.id]: http(),
    [rootstockTestnet.id]: http(),
  },
});
Configuring Privy
The privyConfig object defines how Privy behaves in your app, including authentication methods, wallet behavior, and appearance settings. This configuration is passed into the PrivyProvider from the @privy-io/react-auth package, enabling Privy’s authentication and wallet features across your application. Explore additional options and advanced configurations in Privy's React docs to tailor the experience to your needs.
const privyConfig: PrivyClientConfig = {
embeddedWallets: {
createOnLogin: 'users-without-wallets', // just for social login
},
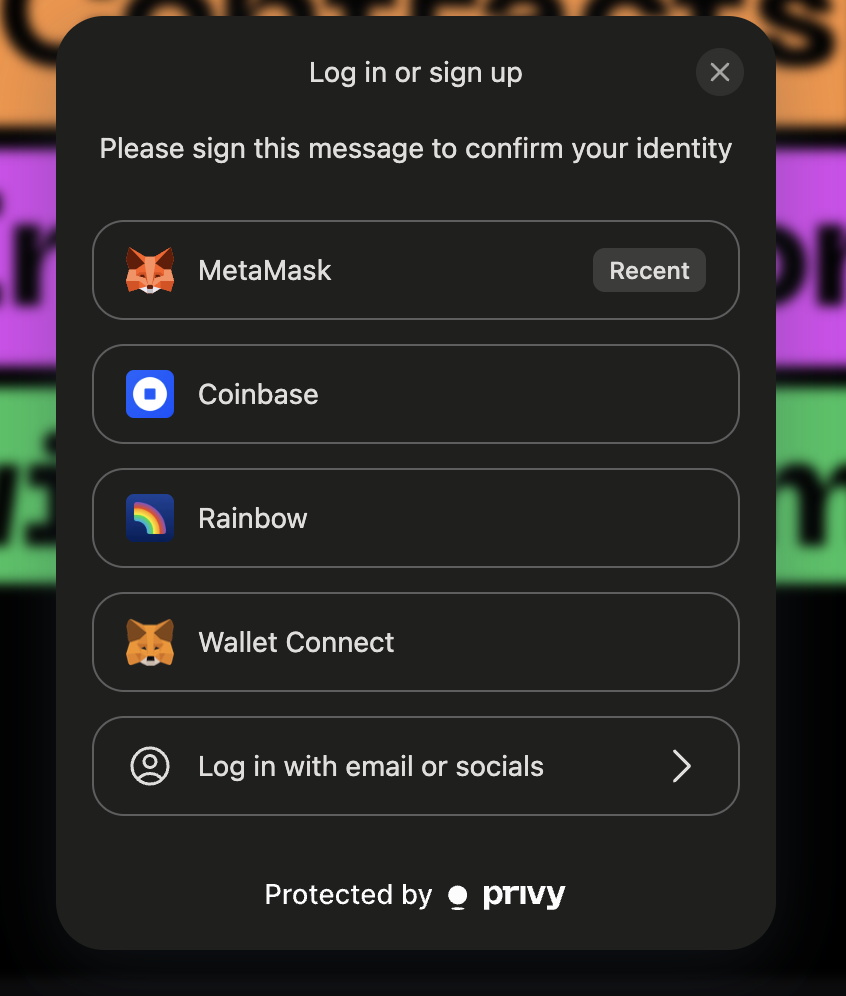
loginMethods: ['wallet', 'email', 'sms', 'google', 'apple'],
appearance: {
showWalletLoginFirst: false, // Social login first
theme: 'dark',
loginMessage: 'Please sign this message to confirm your identity',
walletChainType: 'ethereum-only',
},
defaultChain: rootstockTestnet,
supportedChains: [rootstock, rootstockTestnet],
};
Creating a custom connect button
This custom connect button will be used to trigger wallet connections with your own UI.
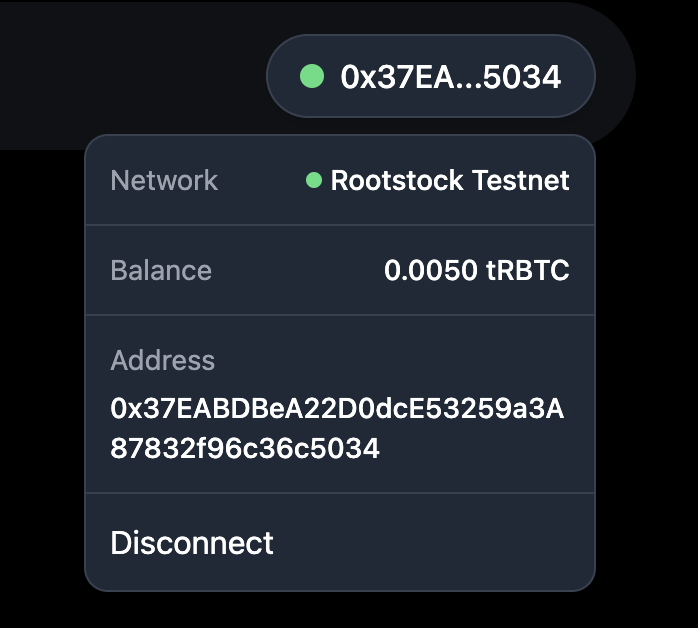
This ConnectButton component allows users to connect their wallet using Privy's built in login popup and then displays a custom UI once they're authenticated. It shows key account details like their wallet address, current network, and balance. All retrieved using Wagmi hooks. Users can also easily disconnect via the dropdown.
Component Setup and Imports
This sets up the necessary React state and hooks from Privy and Wagmi. These libraries provide authentication state, wallet info, on chain account data, and balance retrieval.
import { usePrivy, useWallets } from '@privy-io/react-auth';
import { useAccount, useBalance } from 'wagmi';
import { useState, useRef, useEffect } from 'react';
Handling Authentication
When handling authentication on Privy, the following applies:
usePrivy()gives access to core auth functions — checking if the user is ready or authenticated, and handling login/logout.useWallets()returns wallets managed by Privy, including addresses and connection status.
const { ready, authenticated, login, logout } = usePrivy();
const { wallets } = useWallets();
const activeWallet = wallets?.[0]; // Connected wallet
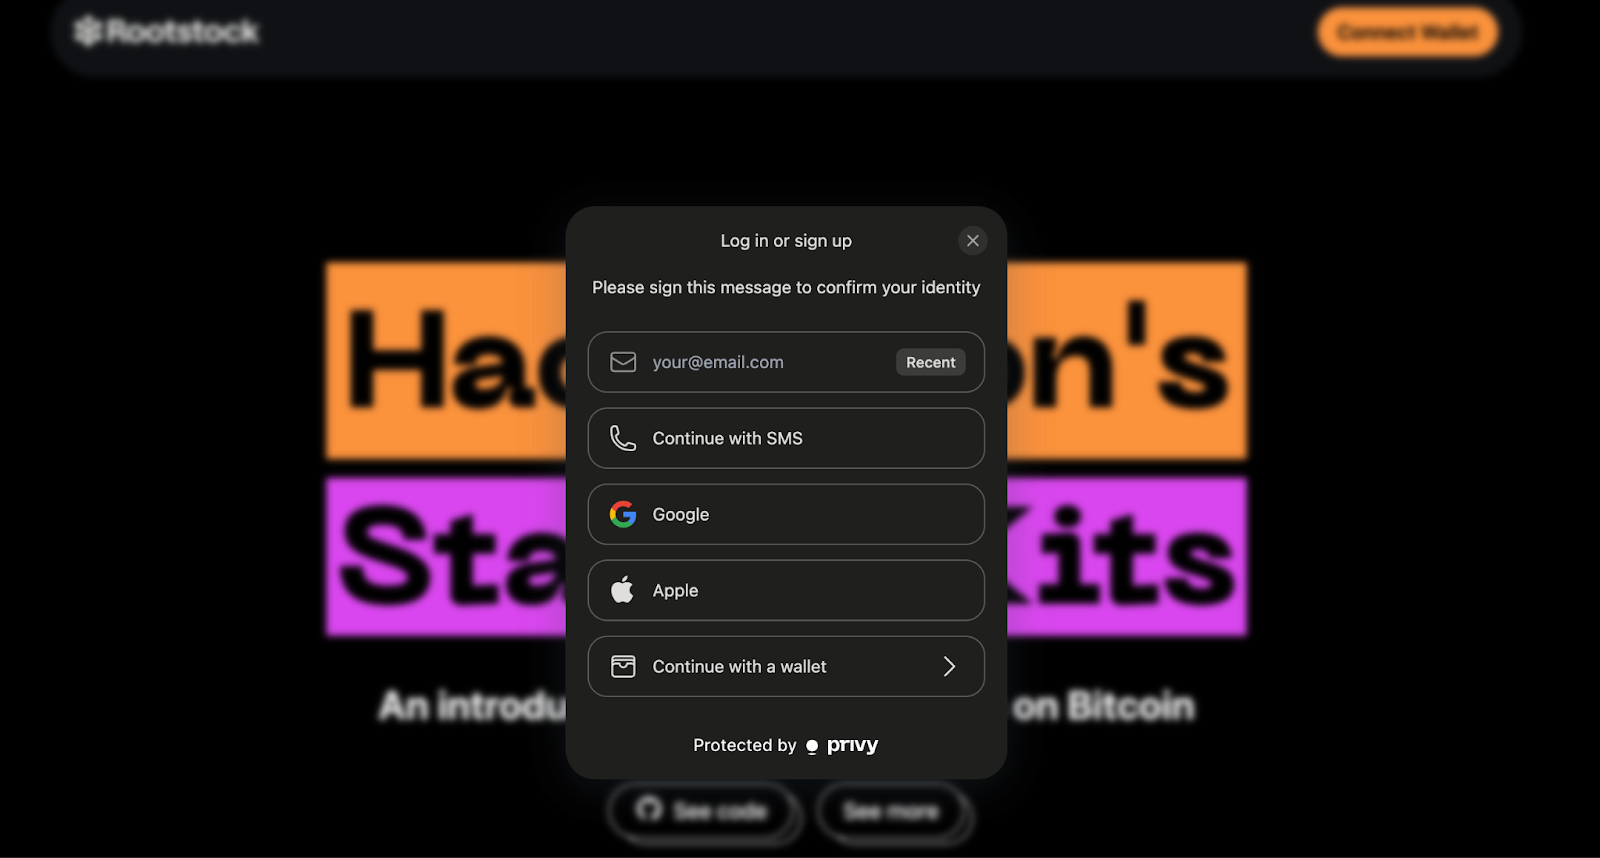
Before the user is connected, the button triggers the Privy login modal. After connection, it shows a custom button with wallet info and toggles the dropdown.
{!authenticated ? (
  <button onClick={login}>Connect Wallet</button>
) : (
  <button onClick={toggleDropdown}>{formatAddress(activeWallet.address)}</button>
)}
Additional Configuration
Based on the use case for your dApp, the authentication UI has some customizable configs such as external wallets.
On default the privy config prioritizes the showWalletLoginFirst: false, but some app could be web3 users centered and might need to have them as default.
Customizing App’s Logo
To customize your app’s logo by defining it in the Privy configuration.
appearance: {
    showWalletLoginFirst: true,
    theme: 'dark',
    loginMessage: 'Please sign this message to confirm your identity',
    walletChainType: 'ethereum-only',
    logo: 'src/assets/rootstock&privy.png'
  }
![]()
Blockchain Account Data
Using Wagmi’s useAccount() and useBalance(), we grab the connected wallet’s current network and token balance, enabling us to display real time on chain data in the dropdown.
const { address, chain } = useAccount();
const { data: balanceData } = useBalance({ address });
1. Using the custom connect button
The custom connect button preserves Privy’s seamless login flow while giving you full control over what users see once they're connected. It’s a clean way to personalize wallet interactions and display key account details in your app’s interface. You can explore the full implementation in ConnectButton.tsx.
<span>{chain?.name}</span>
<span>{balanceData?.formatted}</span>
<span>{activeWallet?.address}</span>
<button onClick={handleLogout}>Disconnect</button>
2. Enabling social logins (Optional) using providers like Google or Twitter for smoother onboarding
To enable social login options like Google, Twitter, or Apple in your Privy-powered app, you can configure them directly through the Privy Dashboard. This allows users to authenticate using their existing social accounts, enhancing the onboarding experience.
Access the Privy Dashboard
Navigate to your app's settings in the Privy Dashboard:
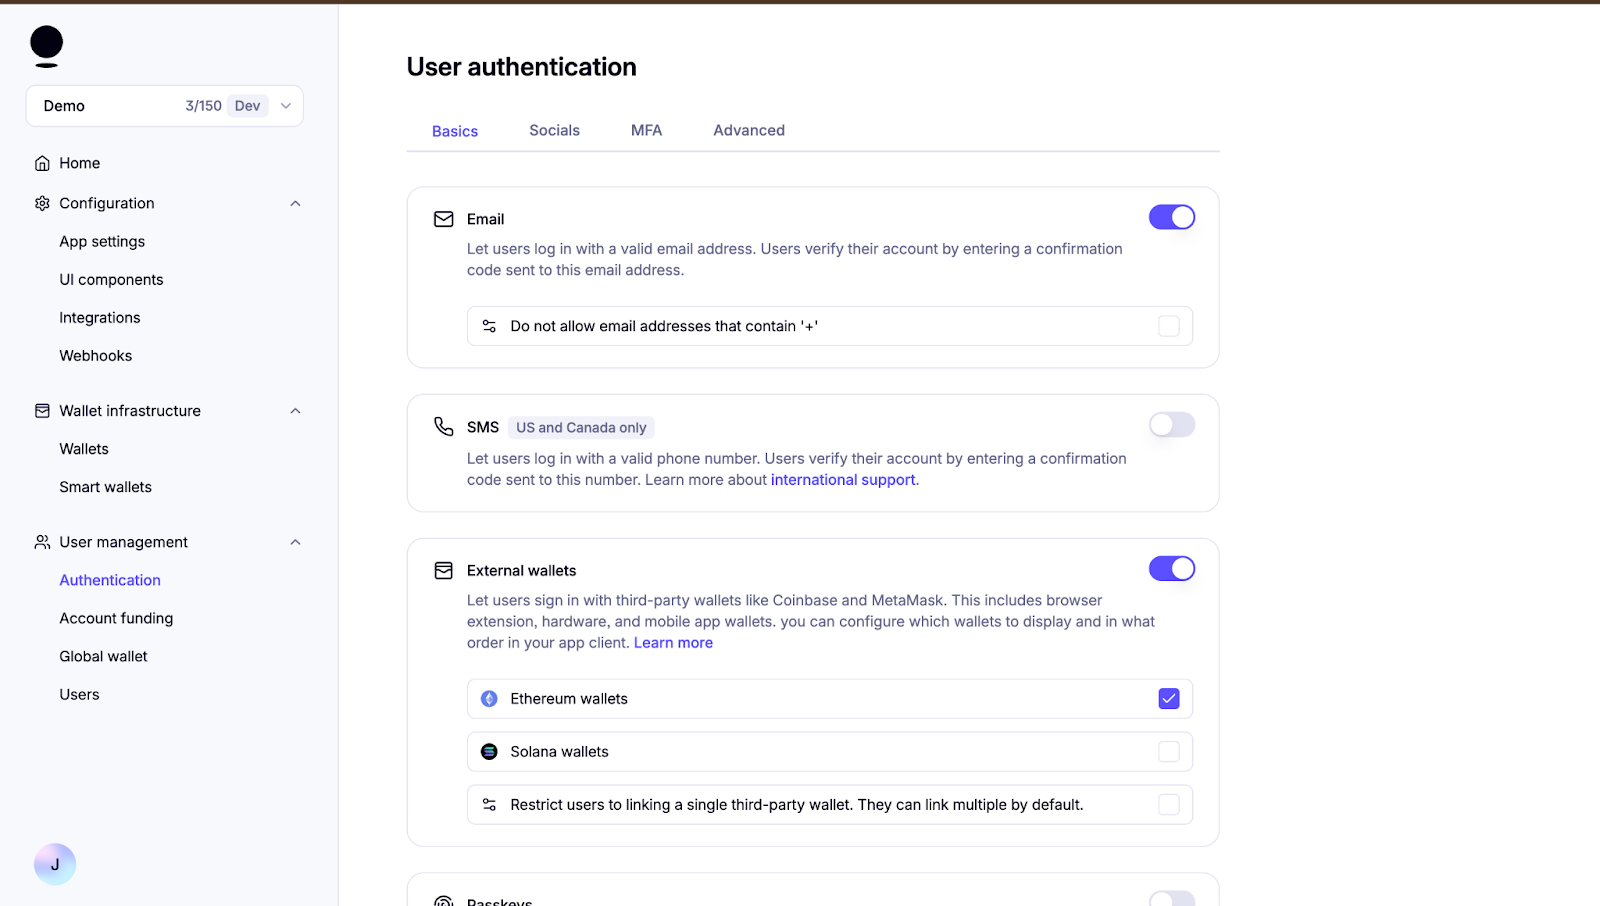
To keep the onboarding simple and accessible, we’ll start by enabling email login, one of the default methods available in Privy’s Basics tab in the Authentication menu. This setup allows users to authenticate without needing a wallet or external identity provider — a great starting point for broader access. Social logins and other methods (like SMS or passkeys) can be configured later from the Socials and Advanced tabs as needed. For full details, refer to Privy’s guide to login methods.
Congratulations, we have successfully learnt how to setup Privy, configure components like Wagmi, handle authentication, customize app logo, enable social logins, etc. With extensive configuration options, support for multiple login strategies, and seamless integration with embedded wallets, Privy adapts to a wide range of environments and use cases. As a secure and customizable solution, Privy is well suited for onboarding users and powering reliable wallet experiences. Integrating it into your app is a strong step toward bringing more users into the Rootstock ecosystem with simplicity and confidence.